BLOGS · HARDWARE BLOGS
PUBLISHED
READING6 min
How to undervolt Radeon R9 270X / HD7870 (and any GCN 1.0 card)
A step-by-step guide to undervolting the Radeon R9 270X, HD7870, and other GCN 1.0 graphics cards to cut down power consumption, temperatures, and noise.
Radeon HD 7870/7850 and R9 270/270X graphics cards dropped out of mining pools a long time ago. Now, online marketplaces are absolutely flooded with these aging GPUs based on the Pitcairn chip and its twin, Curacao.
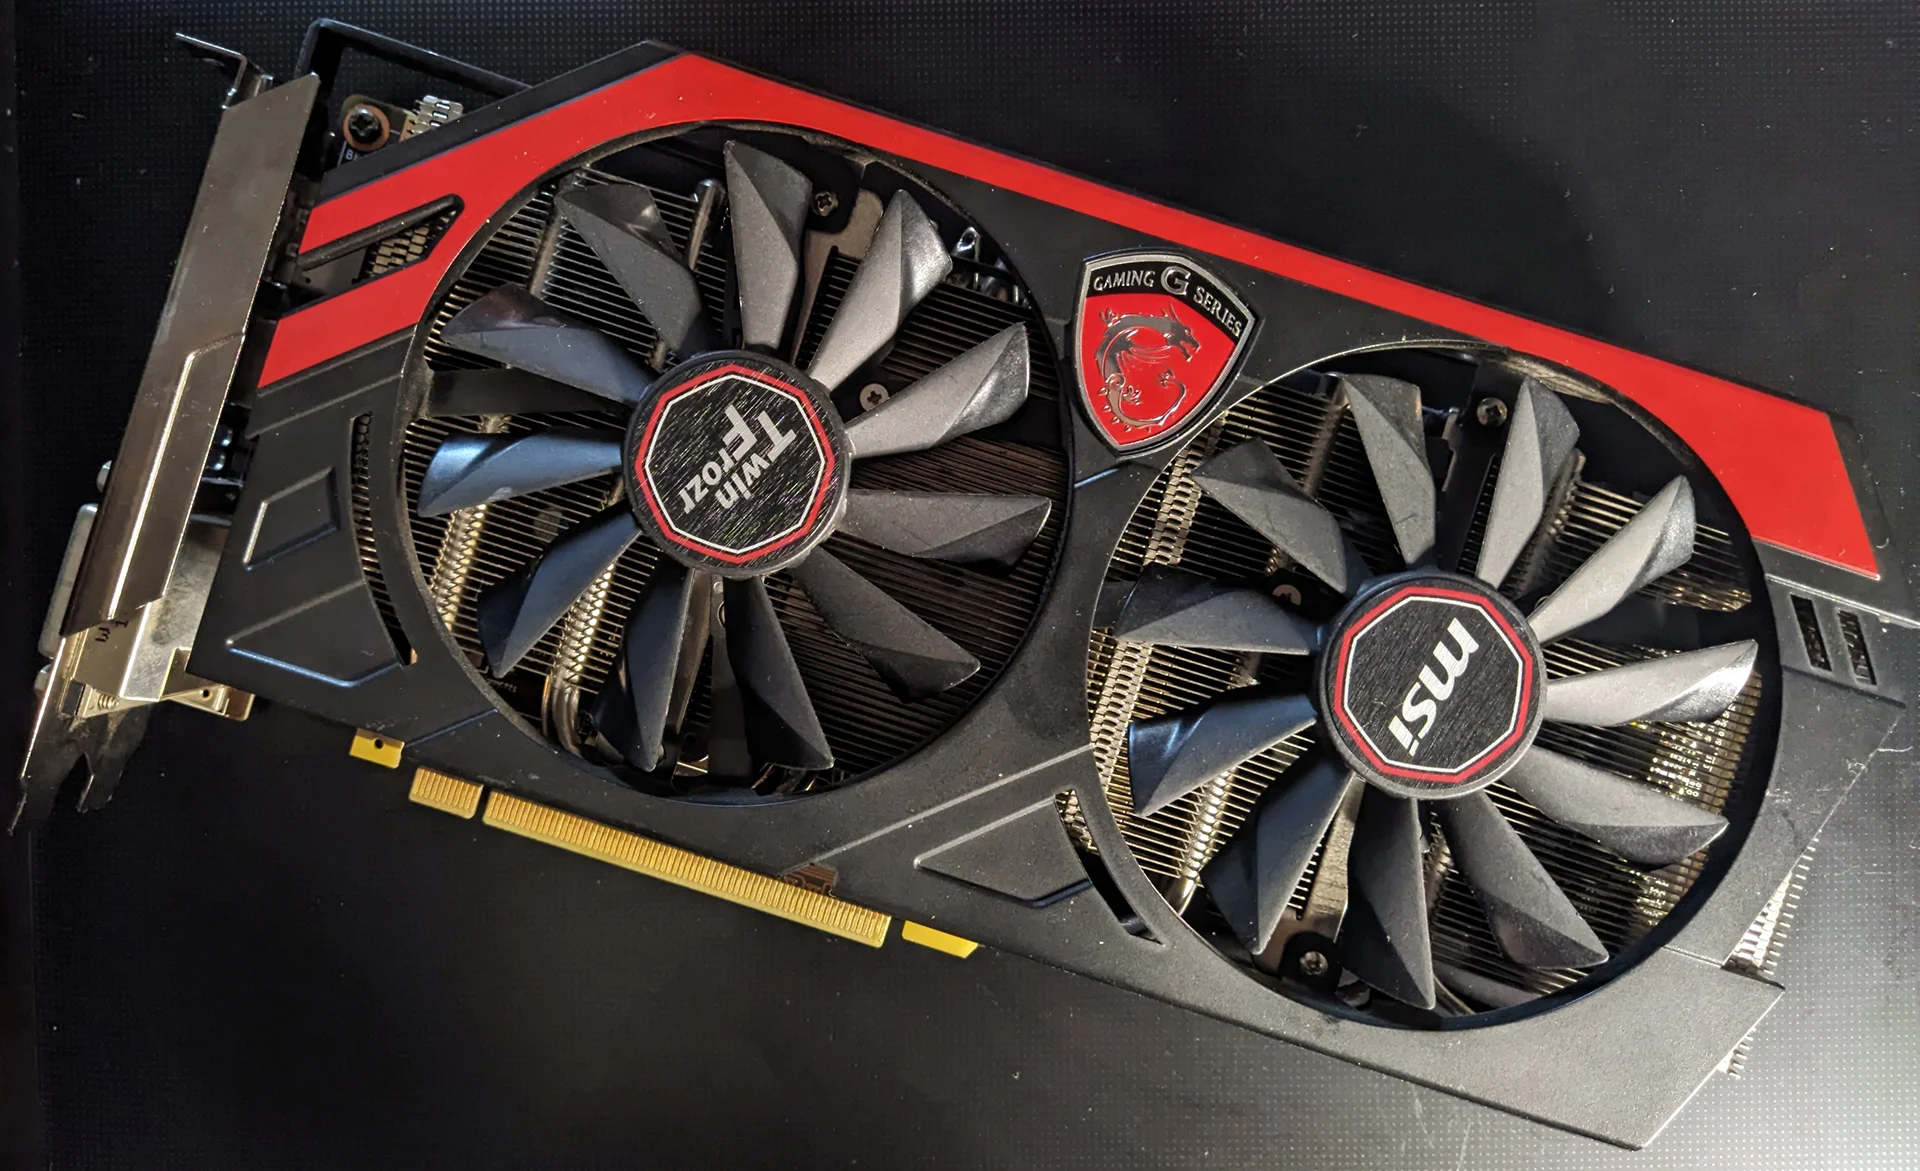
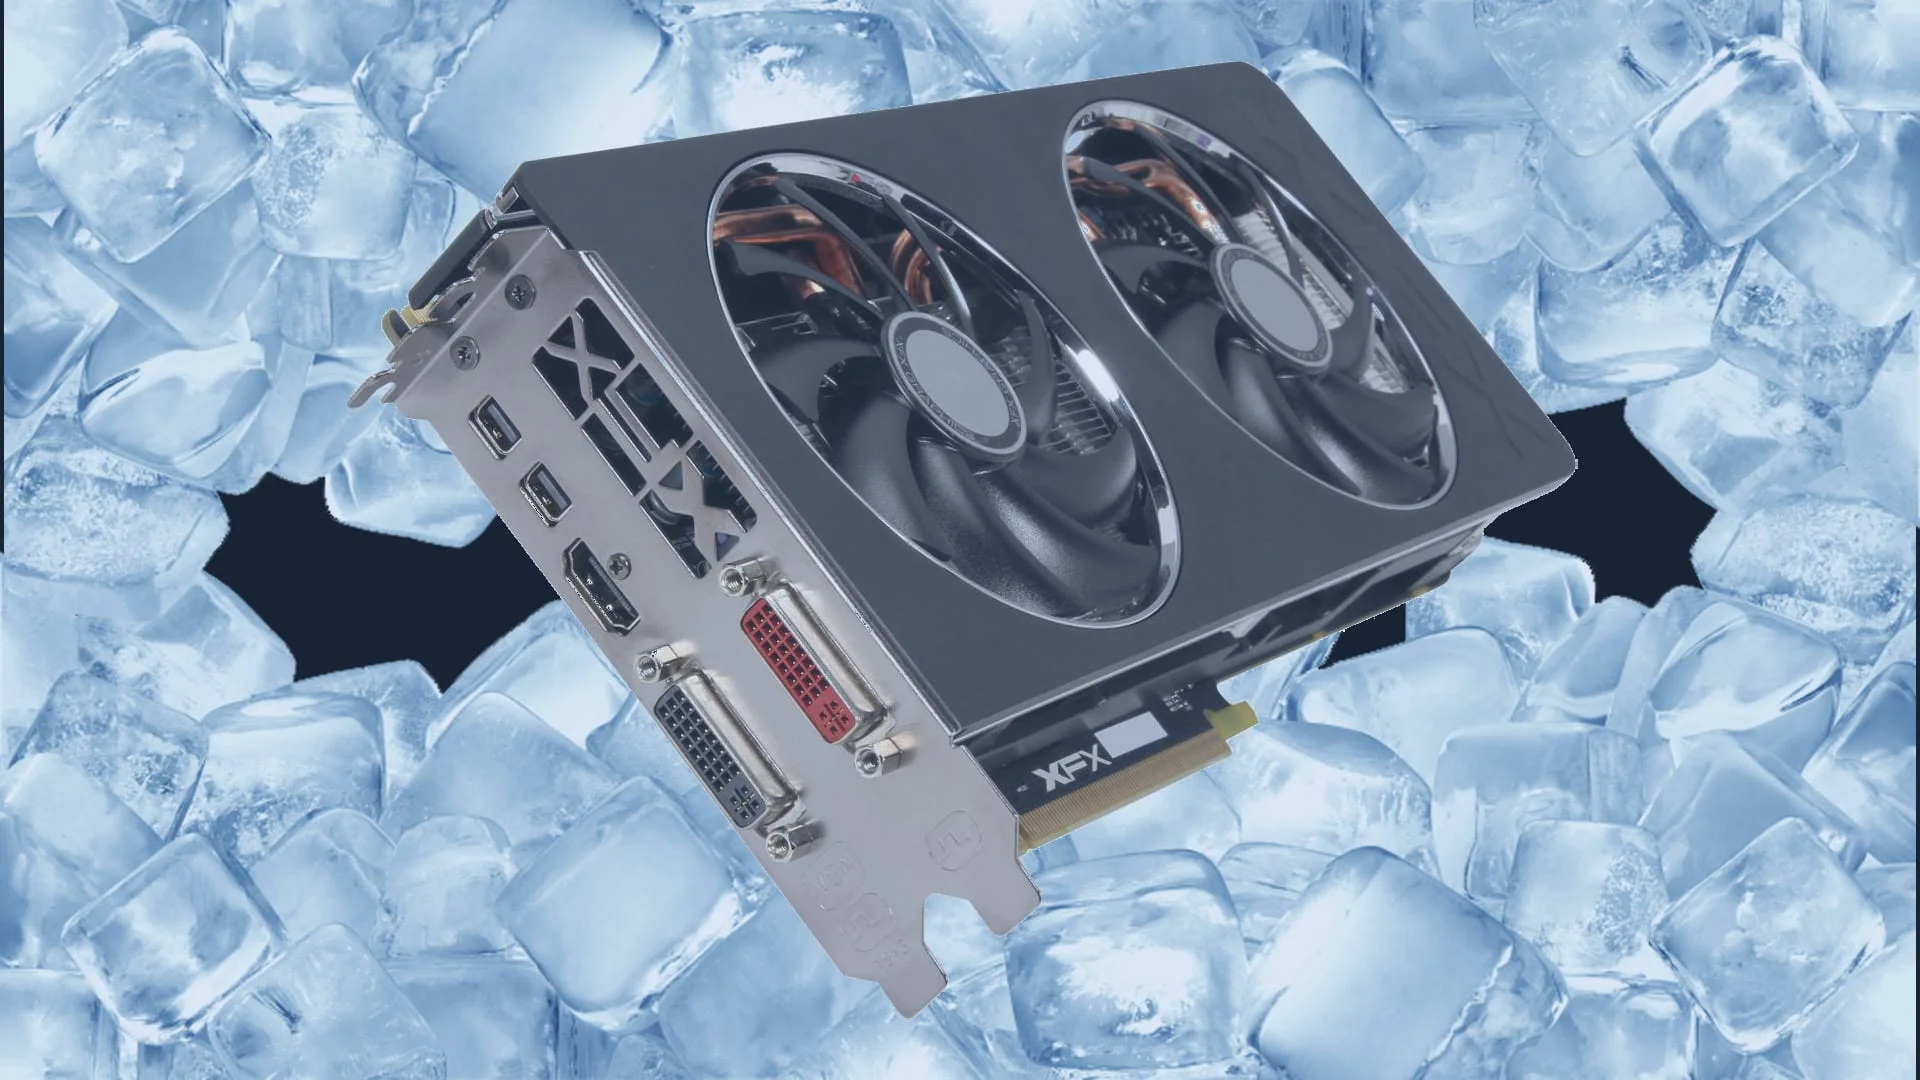
I'm using an XFX Radeon R9 270X (R9-270X-CDFC) for this guide. However, this method works just as well for reference R9 270, 270X, 280, and 280X cards, as well as older Radeon HD 7870/7850 and HD 7970/7950 models.
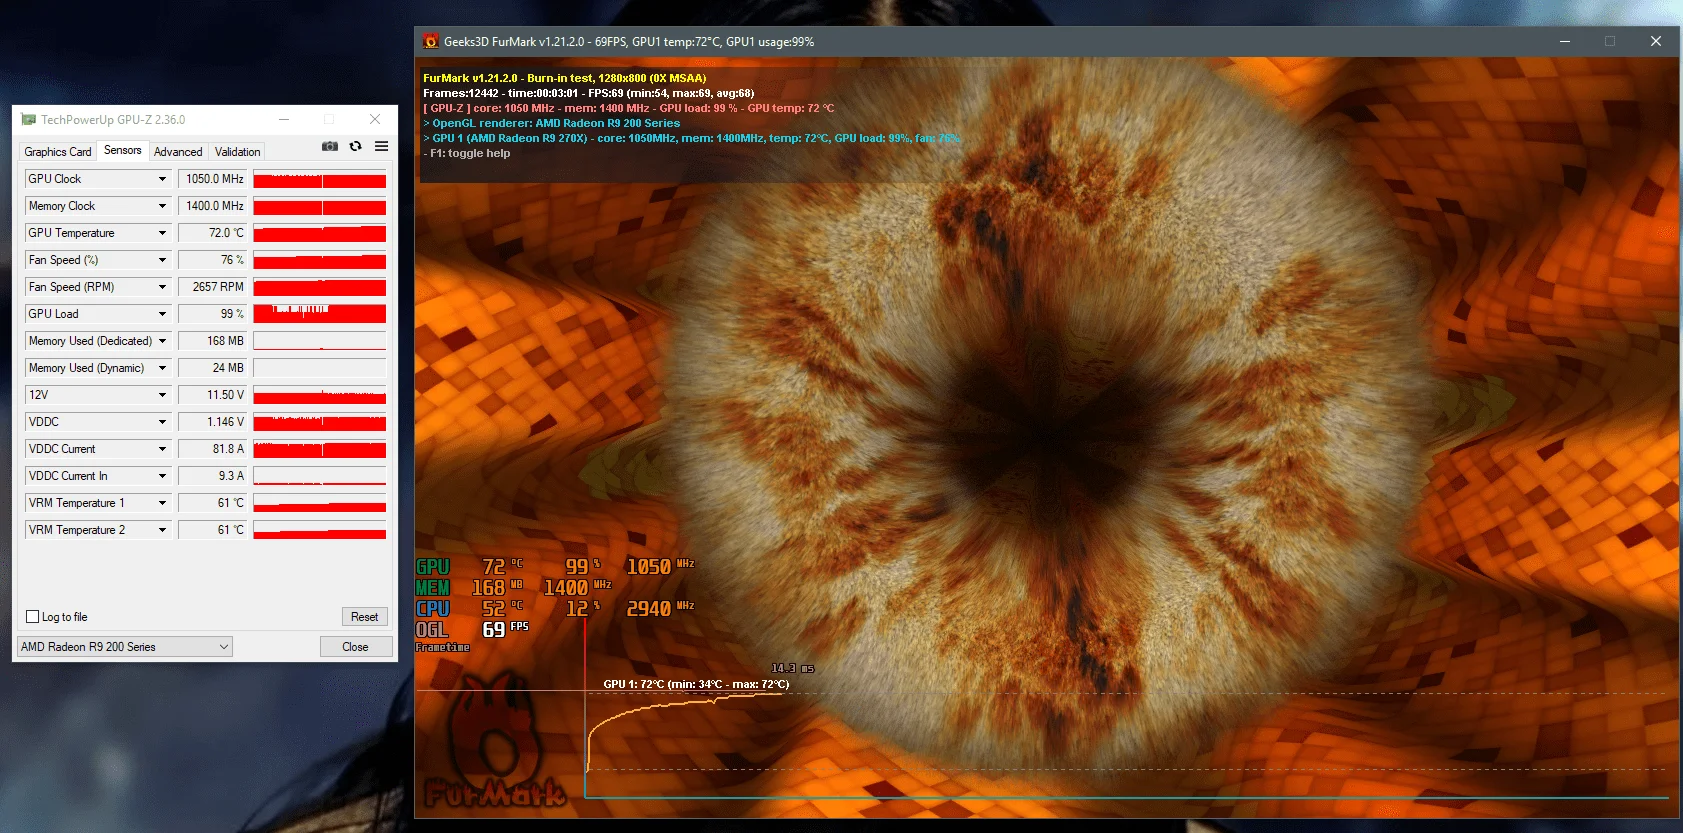
Let's look at the card's stock temperatures and power draw using the unmodified BIOS:
 ⤢ ВІДКРИТИ
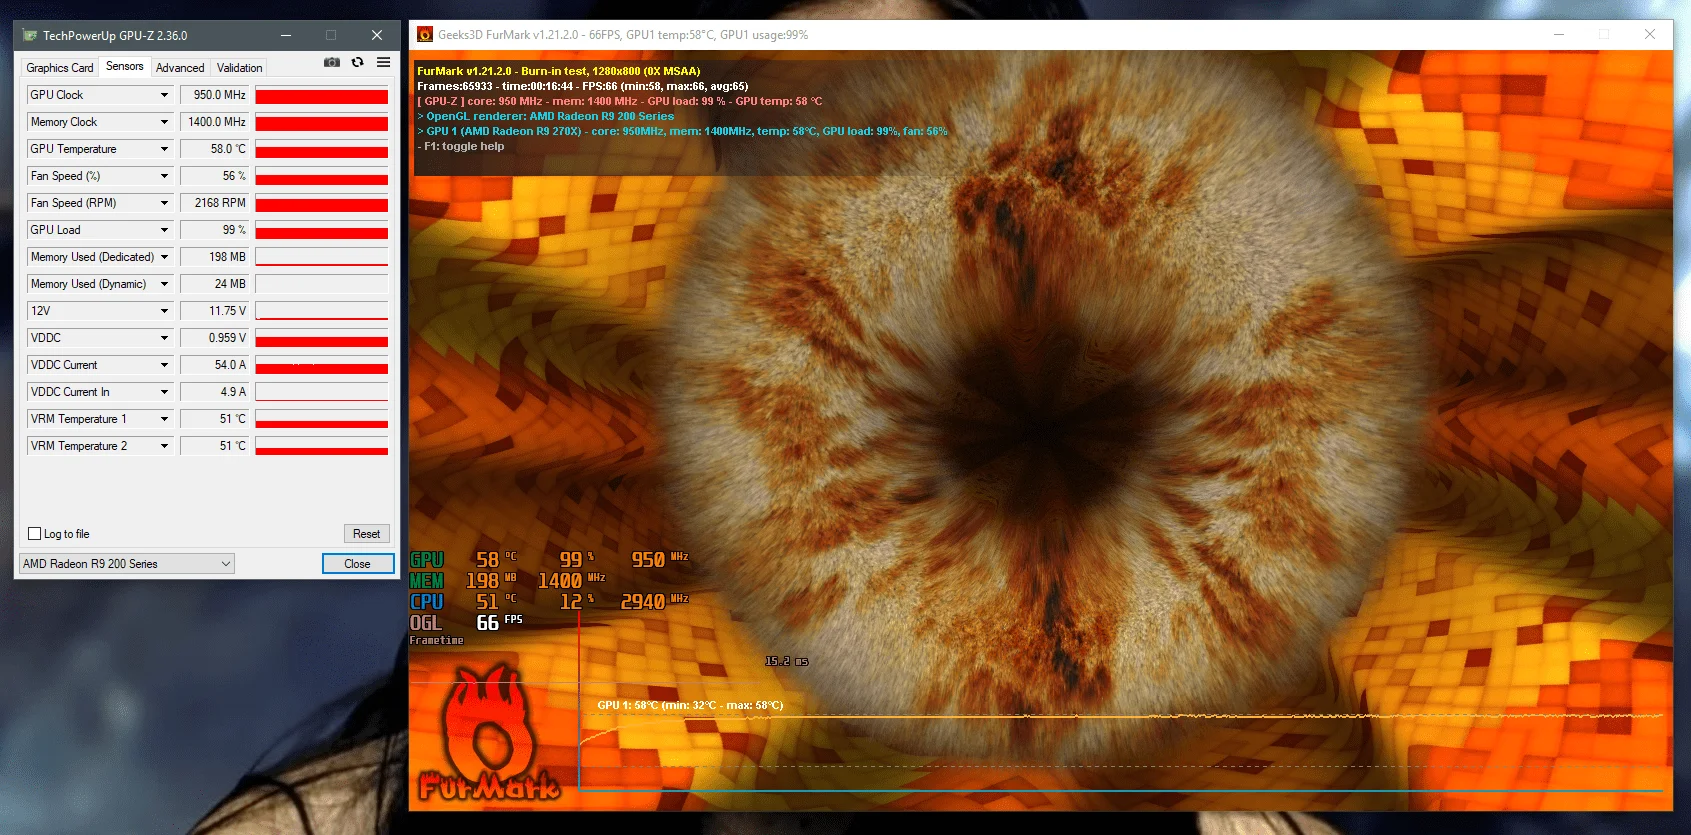
At stock settings (1.150V), the GPU alone draws ~82 amps, or about ~94W (including VRAM, total board power is around 140W). Under load, the GPU reached 72°C with fans spinning at 76%. As the screenshot above shows, the 12V input rail also sagged significantly to 11.50V. Clearly, a 350W power supply struggles to keep up with such a power-hungry card.
This power sag was the main reason I decided to undervolt this card. I needed it to run reliably on a 350W PSU, which meant keeping the 12V rail above 11.70V. While that was my specific goal, this guide will also help you extend your card's lifespan, quiet it down, and lower overall power consumption.
With the intro out of the way, let's move on to undervolting the GPU:
To do this, we'll need a BIOS editor for GCN 1.0 Radeon cards called "VBE7". You can download this utility from the TechPowerUp forums.
You'll also need to install GPU-Z and MSI Afterburner. The former shows your current GPU voltage, while the latter lets you tweak clocks in real time and, most importantly, monitor card temperatures.
WARNING:
ANYTHING YOU DO TO YOUR GRAPHICS CARD IS ENTIRELY AT YOUR OWN RISK! NEITHER THE AUTHOR OF THIS ARTICLE NOR UMTALE LAB WILL BE HELD LIABLE FOR ANY DAMAGE TO YOUR HARDWARE!
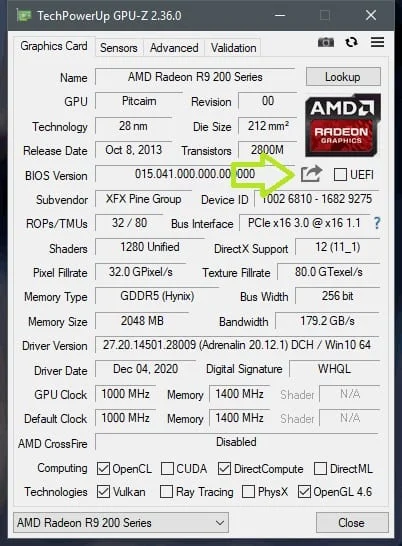
To start, open GPU-Z and back up your stock BIOS using the button indicated by the arrow in the screenshot below:
 ⤢ ВІДКРИТИ
Next, copy (make sure to copy, not cut, so you keep your original backup!) the BIOS file to any folder and open the VBE7 editor.
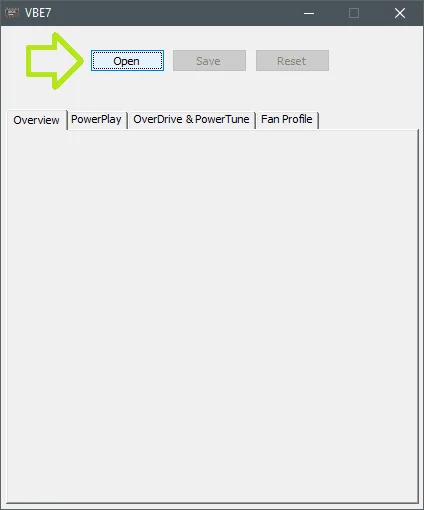 ⤢ ВІДКРИТИ
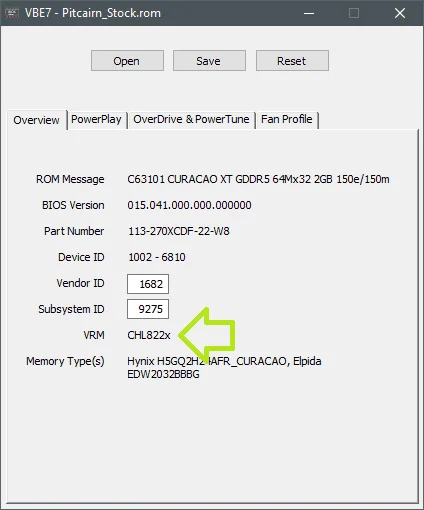
Click "Open" to load the copied file, and verify that the first tab displays one of these controllers next to "VRM": CHL822x, CHL8214, UP1637, UP1801, ST6788A, or VT1556M.
 ⤢ ВІДКРИТИ
In my case, it's the CHL822x. If your controller isn't on the list, you won't be able to dial in precise voltages and will have to make do with the dropdown options. That is still decent, but it definitely limits your room to maneuver.
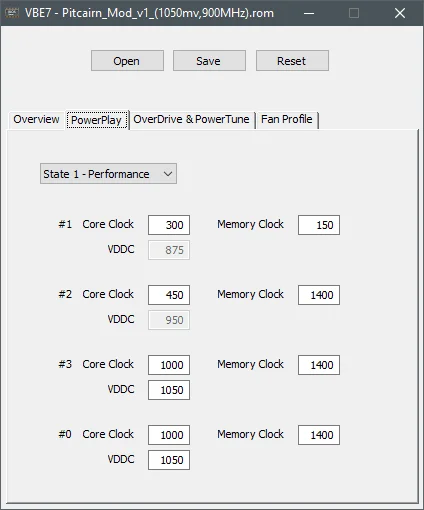
Now switch to the "Power Play" tab. You must edit the bottom two states, #3 and #0 (on HD 7000 series cards, you only edit state #3; state #0 is the turbo boost clock introduced with the R9 line):
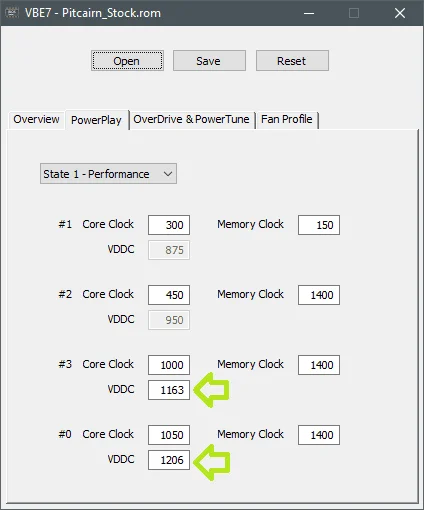 ⤢ ВІДКРИТИ
It all comes down to preference here: you can keep your stock frequency (the Core Clock row) and find the lowest stable voltage (the VDDC row), though I wouldn't recommend dropping below 1.1V. Alternatively, you can target a specific voltage (preferably no lower than 0.900V) and find a stable frequency for it. For the latter approach, it's best to start by dropping the clock speed to 700-900MHz and working up from there.
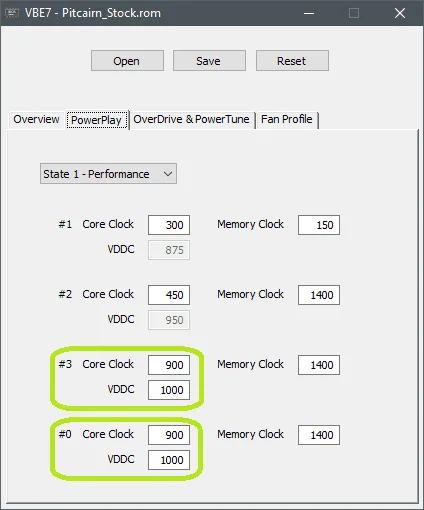
I went with the second option, setting the VDDC to exactly 1000mV (1V) and a safe baseline Core Clock of 900MHz. Then, I clicked "Save" and saved the new BIOS to a separate file:
 ⤢ ВІДКРИТИ
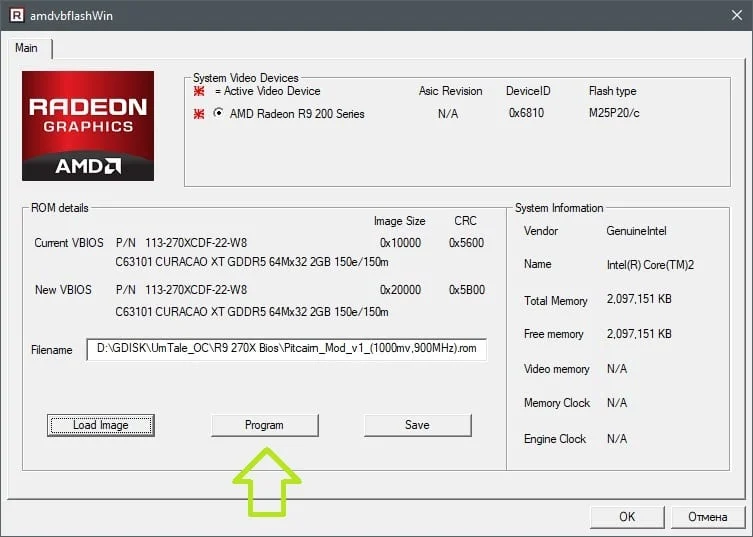
Next, I opened the ATI ATIFlash (AMD VBFlash) utility and clicked "LoadImage" to open the newly created BIOS file:
 ⤢ ВІДКРИТИ
I then flashed it to the card using the "Program" button:
 ⤢ ВІДКРИТИ
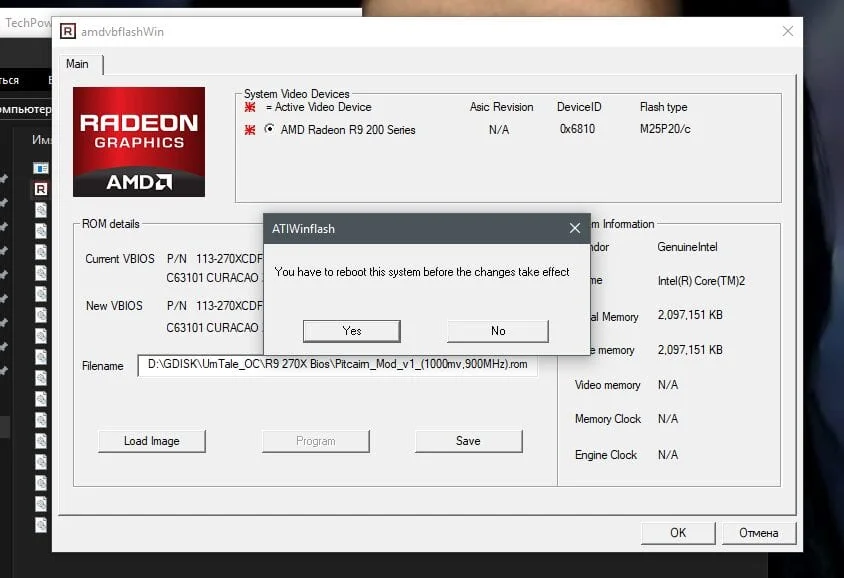
If successful, the utility will prompt you to reboot for the changes to take effect. If you get a "Fail!" error, simply click "Program" again.
 ⤢ ВІДКРИТИ
Next, I started testing with the FurMark GPU stress test. By raising the core clock in MSI Afterburner by ~15 MHz every 5 minutes, I found that my GPU runs stably at 950 MHz with 1000 mV:
 ⤢ ВІДКРИТИ
At 1000 MHz, FurMark immediately crashed, clearly pointing to insufficient voltage. So, I decided to slightly bump it up to 1.05 V.
 ⤢ ВІДКРИТИ
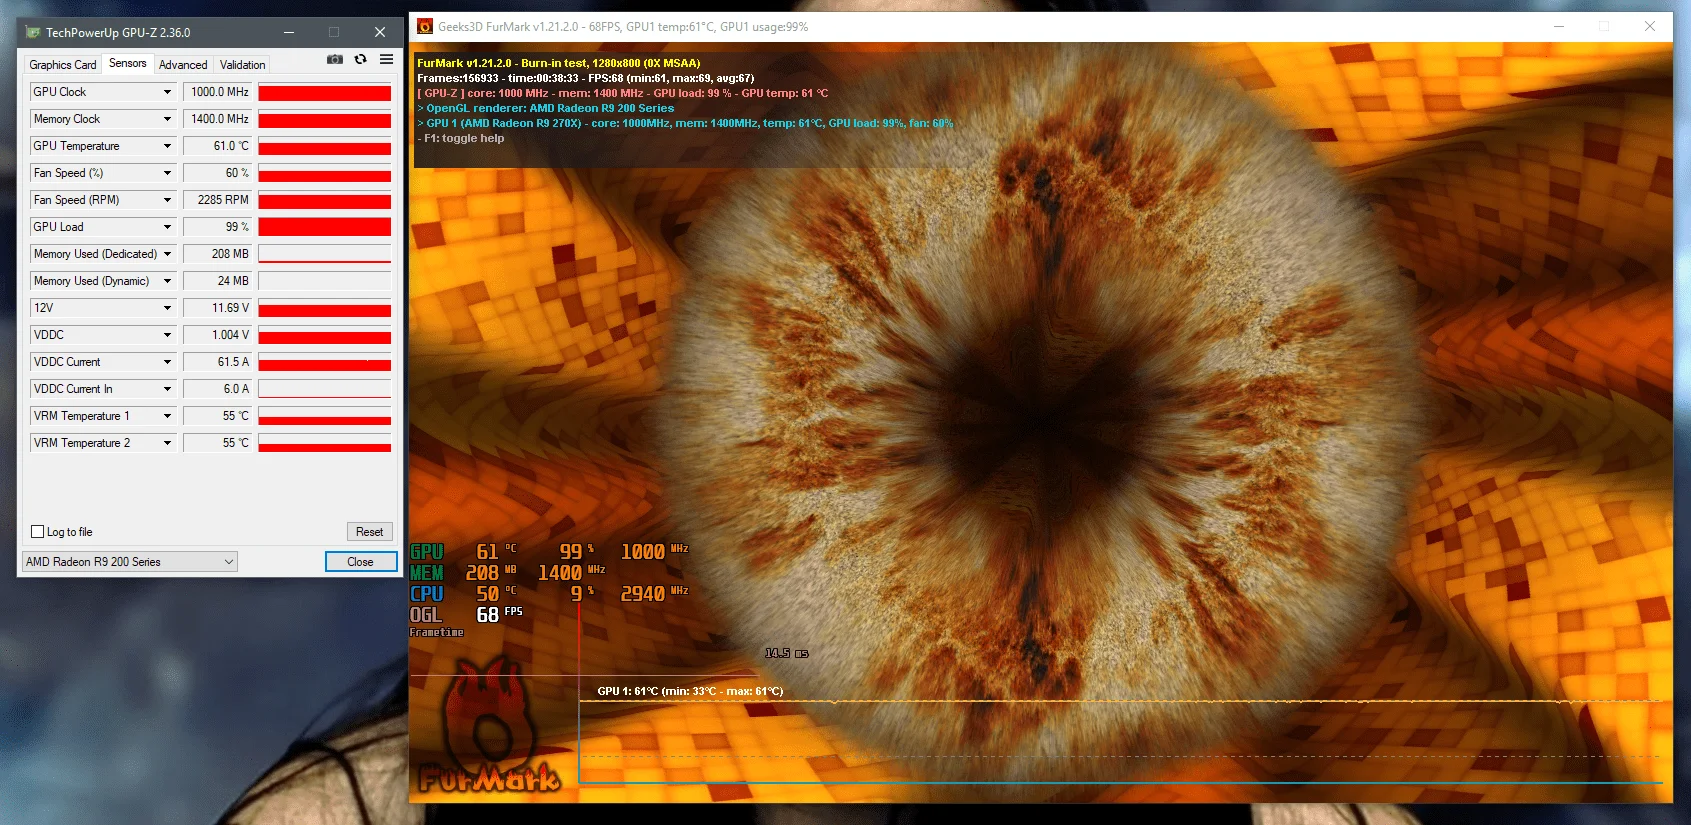
Ultimately, the graphics card ran stably for 38 minutes in the "donut" stress test, leaving me confident that further testing wouldn't yield any surprises:
 ⤢ ВІДКРИТИ
Peak temperatures dropped by 16 degrees, which also noticeably quieted down the aging cooler. At the same time, GPU power consumption plunged from 94 to 62 watts! Honestly, this alone makes undervolting absolutely worth it.
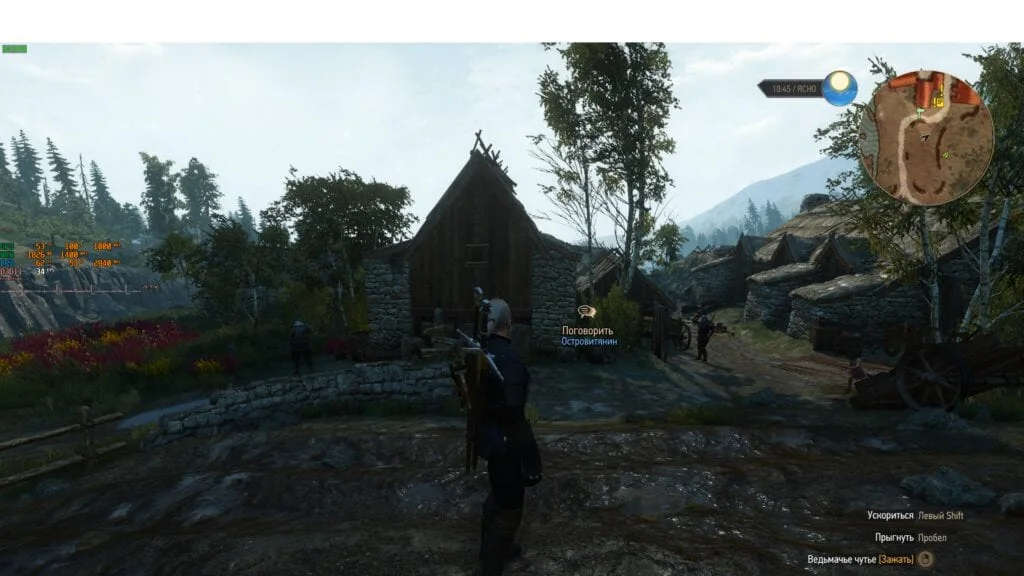
Aside from FurMark, I used The Witcher 2, The Witcher 3, and Destiny 2 at 2560x1440 for heavy 3D loads. The XFX R9 270X with the modified BIOS handled every single game without any issues.
 ⤢ ВІДКРИТИ
In The Witcher, for instance, temperatures never exceeded 53 degrees, which is 8 degrees cooler than in the "donut" test. Naturally, power consumption in games will also be slightly lower than in the stress test.
Below are links to all the software used in this guide, along with a few custom BIOS files with reduced power limits for the XFX Radeon R9 270X:
You can download the VBE7 BIOS editor from this link.
You can download the ATI ATIFlash / AMD VBFlash utility from this link.
XFX Radeon R9 270X BIOS with 1000 mV voltage and 900/1400 MHz clocks:
Download
XFX Radeon R9 270X BIOS with 1050 mV voltage and 1000/1400 MHz clocks:
Download
If you have any questions or feedback, feel free to drop them in the comments.