The Radeon video cards of HD 7870/7850 and R9 270/270X series fell out of the mining pool for a long time and now most of the trading platforms are literally inundated with an extensive assortment of old devices based on the Pitcairn GPU and its twin brother Curacao.
Specifically, in my case, we are dealing with an XFX Radeon R9 270X (R9-270X-CDFC) video card. However, this method is suitable for both conventional (reference) video cards R9 270, 270X, 280, 280X, and for older Radeon HD 7870/7850 and HD 7970/7950.
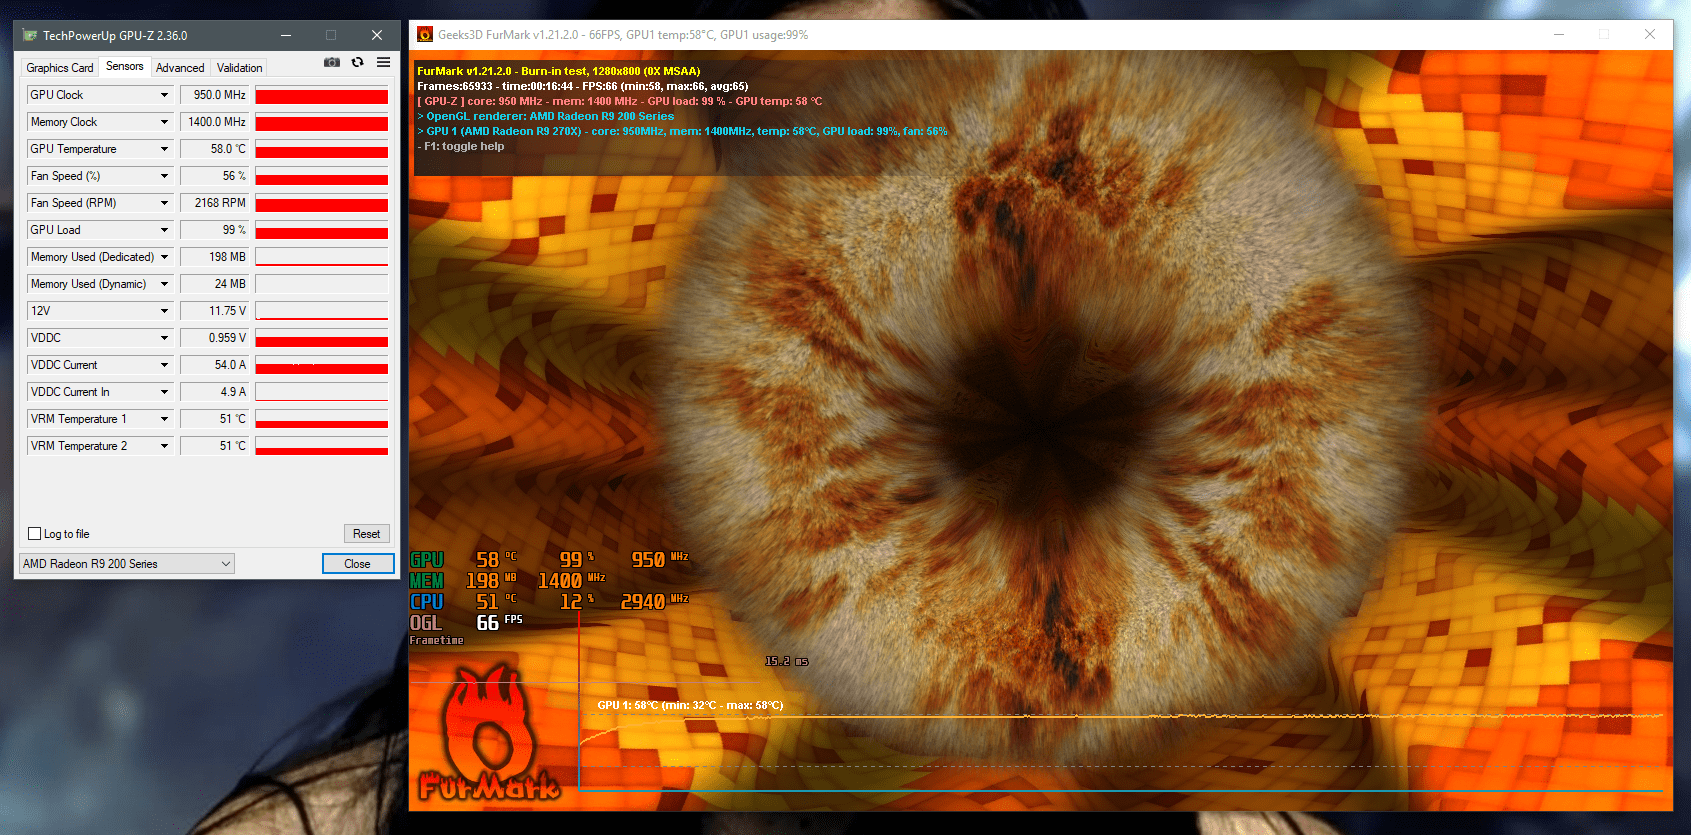
Let’s take a look at the temperatures and power consumption of the card when using the native, unmodified BIOS:

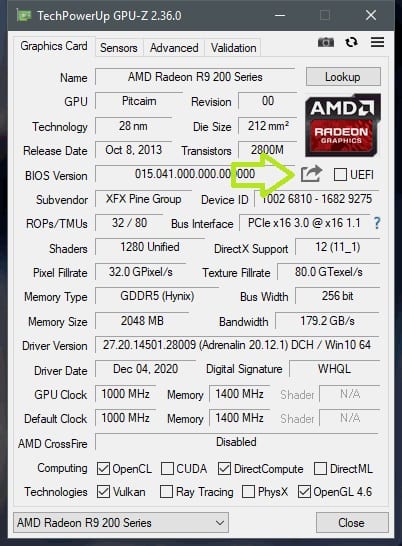
In the stock, at a voltage of 1.150 volts, the GPU consumption is ~ 82 amperes, which is approximately equal to ~ 94 watts (here the figures are indicated exclusively for the GPU, together with the video memory, the card’s consumption equals ~ 140 watts). The GPU warmed up to 72 degrees at 76% fan speed. In addition, as you can see in the above screenshot, the input voltage of 12 volts dropped quite noticeably and was equal to 11.50 volts: a 350-watt power supply is not capable of adequately functioning with such a relatively gluttonous video card.
This, by the way, is one of the main reasons why I undertook the undervolting of this graphics adapter. It must work adequately on a 350-watt power supply, which means it must go within 11.70 volts. But, this is my personal need. For you, my guide will allow you to extend the life of a video card, and, just as importantly, to reduce its noise, as well as power consumption.
With the introduction we finished, now let’s start lowering the GPU supply voltage:
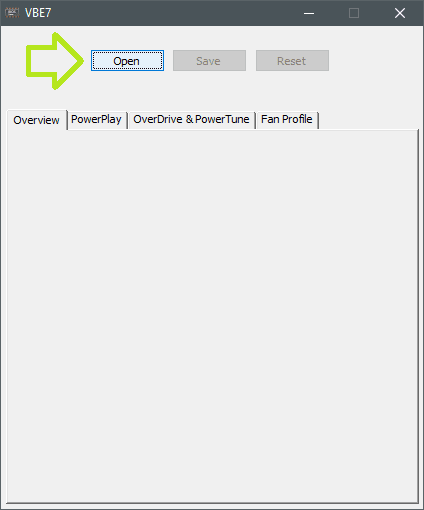
To do this, we need a BIOS editor for Radeon video cards of the GCN 1.0 generation “VBE7“. This program can be downloaded from the TechPowerUp forum.
Also, be sure to install GPU-z and MSI Afterburner. The first will allow you to find out the current GPU voltage, and the second will allow you to edit the frequency of the GPU in real-time, and, which is VERY IMPORTANT, monitor the temperature of the video card.
ATTENTION:
EVERYTHING YOU WILL DO WITH YOUR VIDEO CARD, YOU DO EXCLUSIVELY AT YOUR OWN RISK! NEITHER THE AUTHOR OF THIS MATERIAL NOR THE RESOURCE OF UmTale Lab SHALL BE RESPONSIBLE FOR YOUR PROPERTY!
First, launch the GPU-z info program and (securely) save the stock BIOS using the button pointed to by the arrow in the screenshot below:
Next, copy (just copy, not cut, so that you have a backup of the factory firmware!) The resulting file into any folder and run the VBE7 editor.
Using the “Open” button, open the copied file and make sure that on the same first tab of the program, opposite “VRM” you have one of the following controllers CHL822x, CHL8214, UP1637, UP1801, ST6788A, or VT1556M.
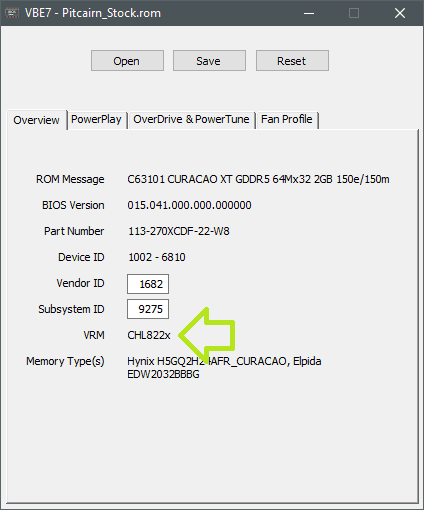
In my case, this is CHL822x. If your controller is not on the list, then you will not be able to set the exact voltage, and you will have to be content with only a drop-down voltage table. Which in general is not particularly bad either, but the room for maneuver is greatly narrowed.
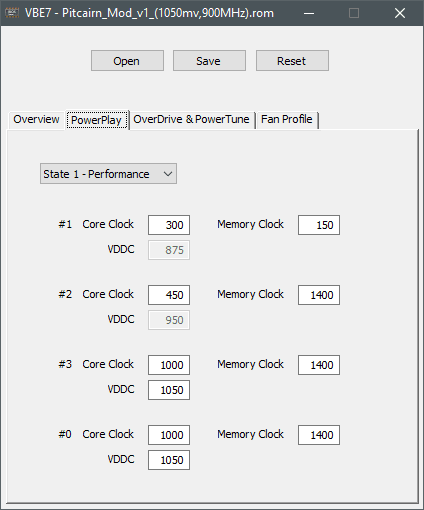
Now go to the “Power Play” tab and FOR SURE edit the bottom two (in the case of HD 7000 video cards one, #3) positions #3 and #0 (position #0 is the turbo boost frequency that appeared in the R9 line):
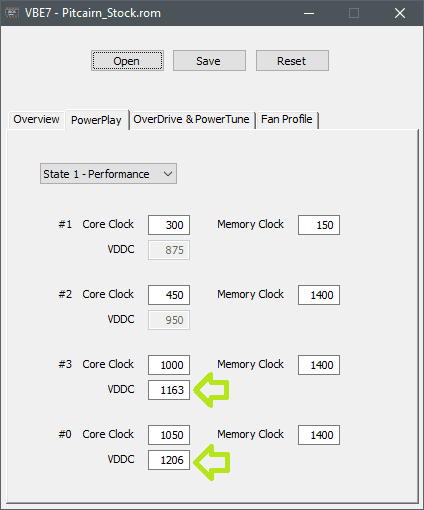
It all depends on your preferences: you can select the stock frequency value (Core Clock line) and select the voltage for it (VDDC line) (then it is better not to lower the voltage below 1.1 volts), or, you can select a specific voltage (then it is better not to lower it below 0.900 volts) and select the frequency for it (in this case, it is better to seriously lower the frequency to 700-900 MHz and start from it).
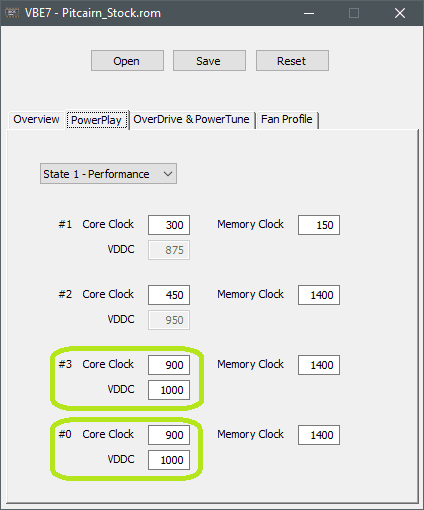
Personally, I chose the second option and set exactly 1000 millivolts (1 volt VDDC), as well as the minimum safe voltage for this 900 MHz (Core Clock), after which I pressed the “Save” button and saved the new firmware to a separate file:
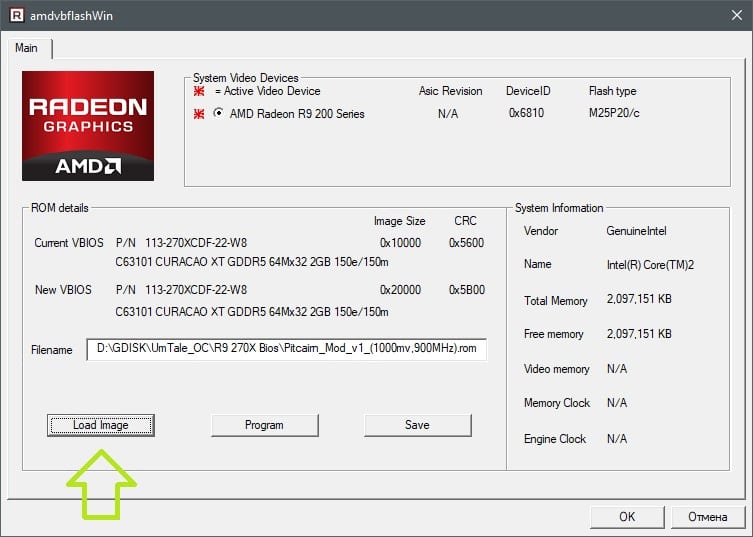
Then I ran the program for flashing the ATI ATIFlash BIOS (AMD VBFlash), loaded the just made BIOS file using the “Load Image” button:
And I sewed it onto the card using the “Program” button:
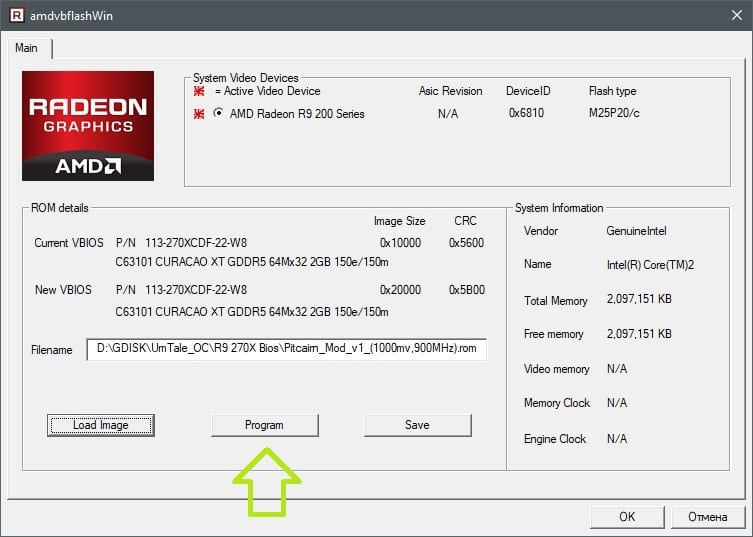
If everything was successful, the program will ask you to reboot for the changes to take effect. If it gives an error with the inscription “Fail!” – just press the “Program” button again.

Then I moved on to stress testing for FurMark video cards: By increasing the chip frequency in MSI Afteburner by ~ 15MHz every 5 minutes (sighting time), I found out that at 1000mV voltage my GPU is able to operate stably at 950MHz:
At 1000MHz, FurMark instantly freezes, which obviously indicates a lack of supply voltage. Therefore, I decided to slightly raise the voltage to 1.05 volts.
As a result, the video card was able to work stably for 38 minutes in a FurMark, after which I was sure that further tests would not bring any surprises:
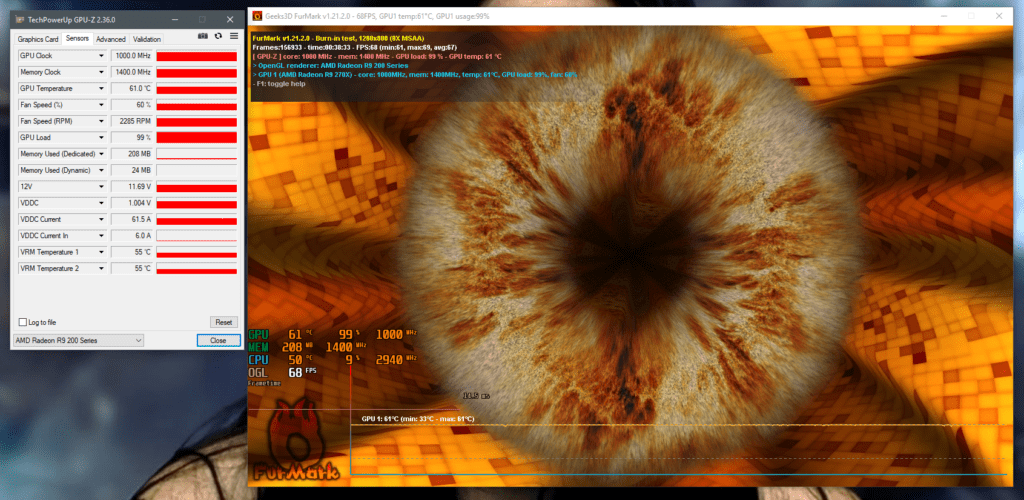
The maximum temperature dropped by 16 degrees, along with which the noise level emitted by the elderly cooling system significantly decreased. In parallel, GPU power consumption dropped from 94 to 62 watts! In my opinion, because of this, it is worth carrying out the undervolting procedure.
In addition to FurMark, I used The Witcher 2/3 and Destiny 2 games running at 2560×1440 as an intense 3D load. The modified bios XFX R9 270X handled every game without any problems.
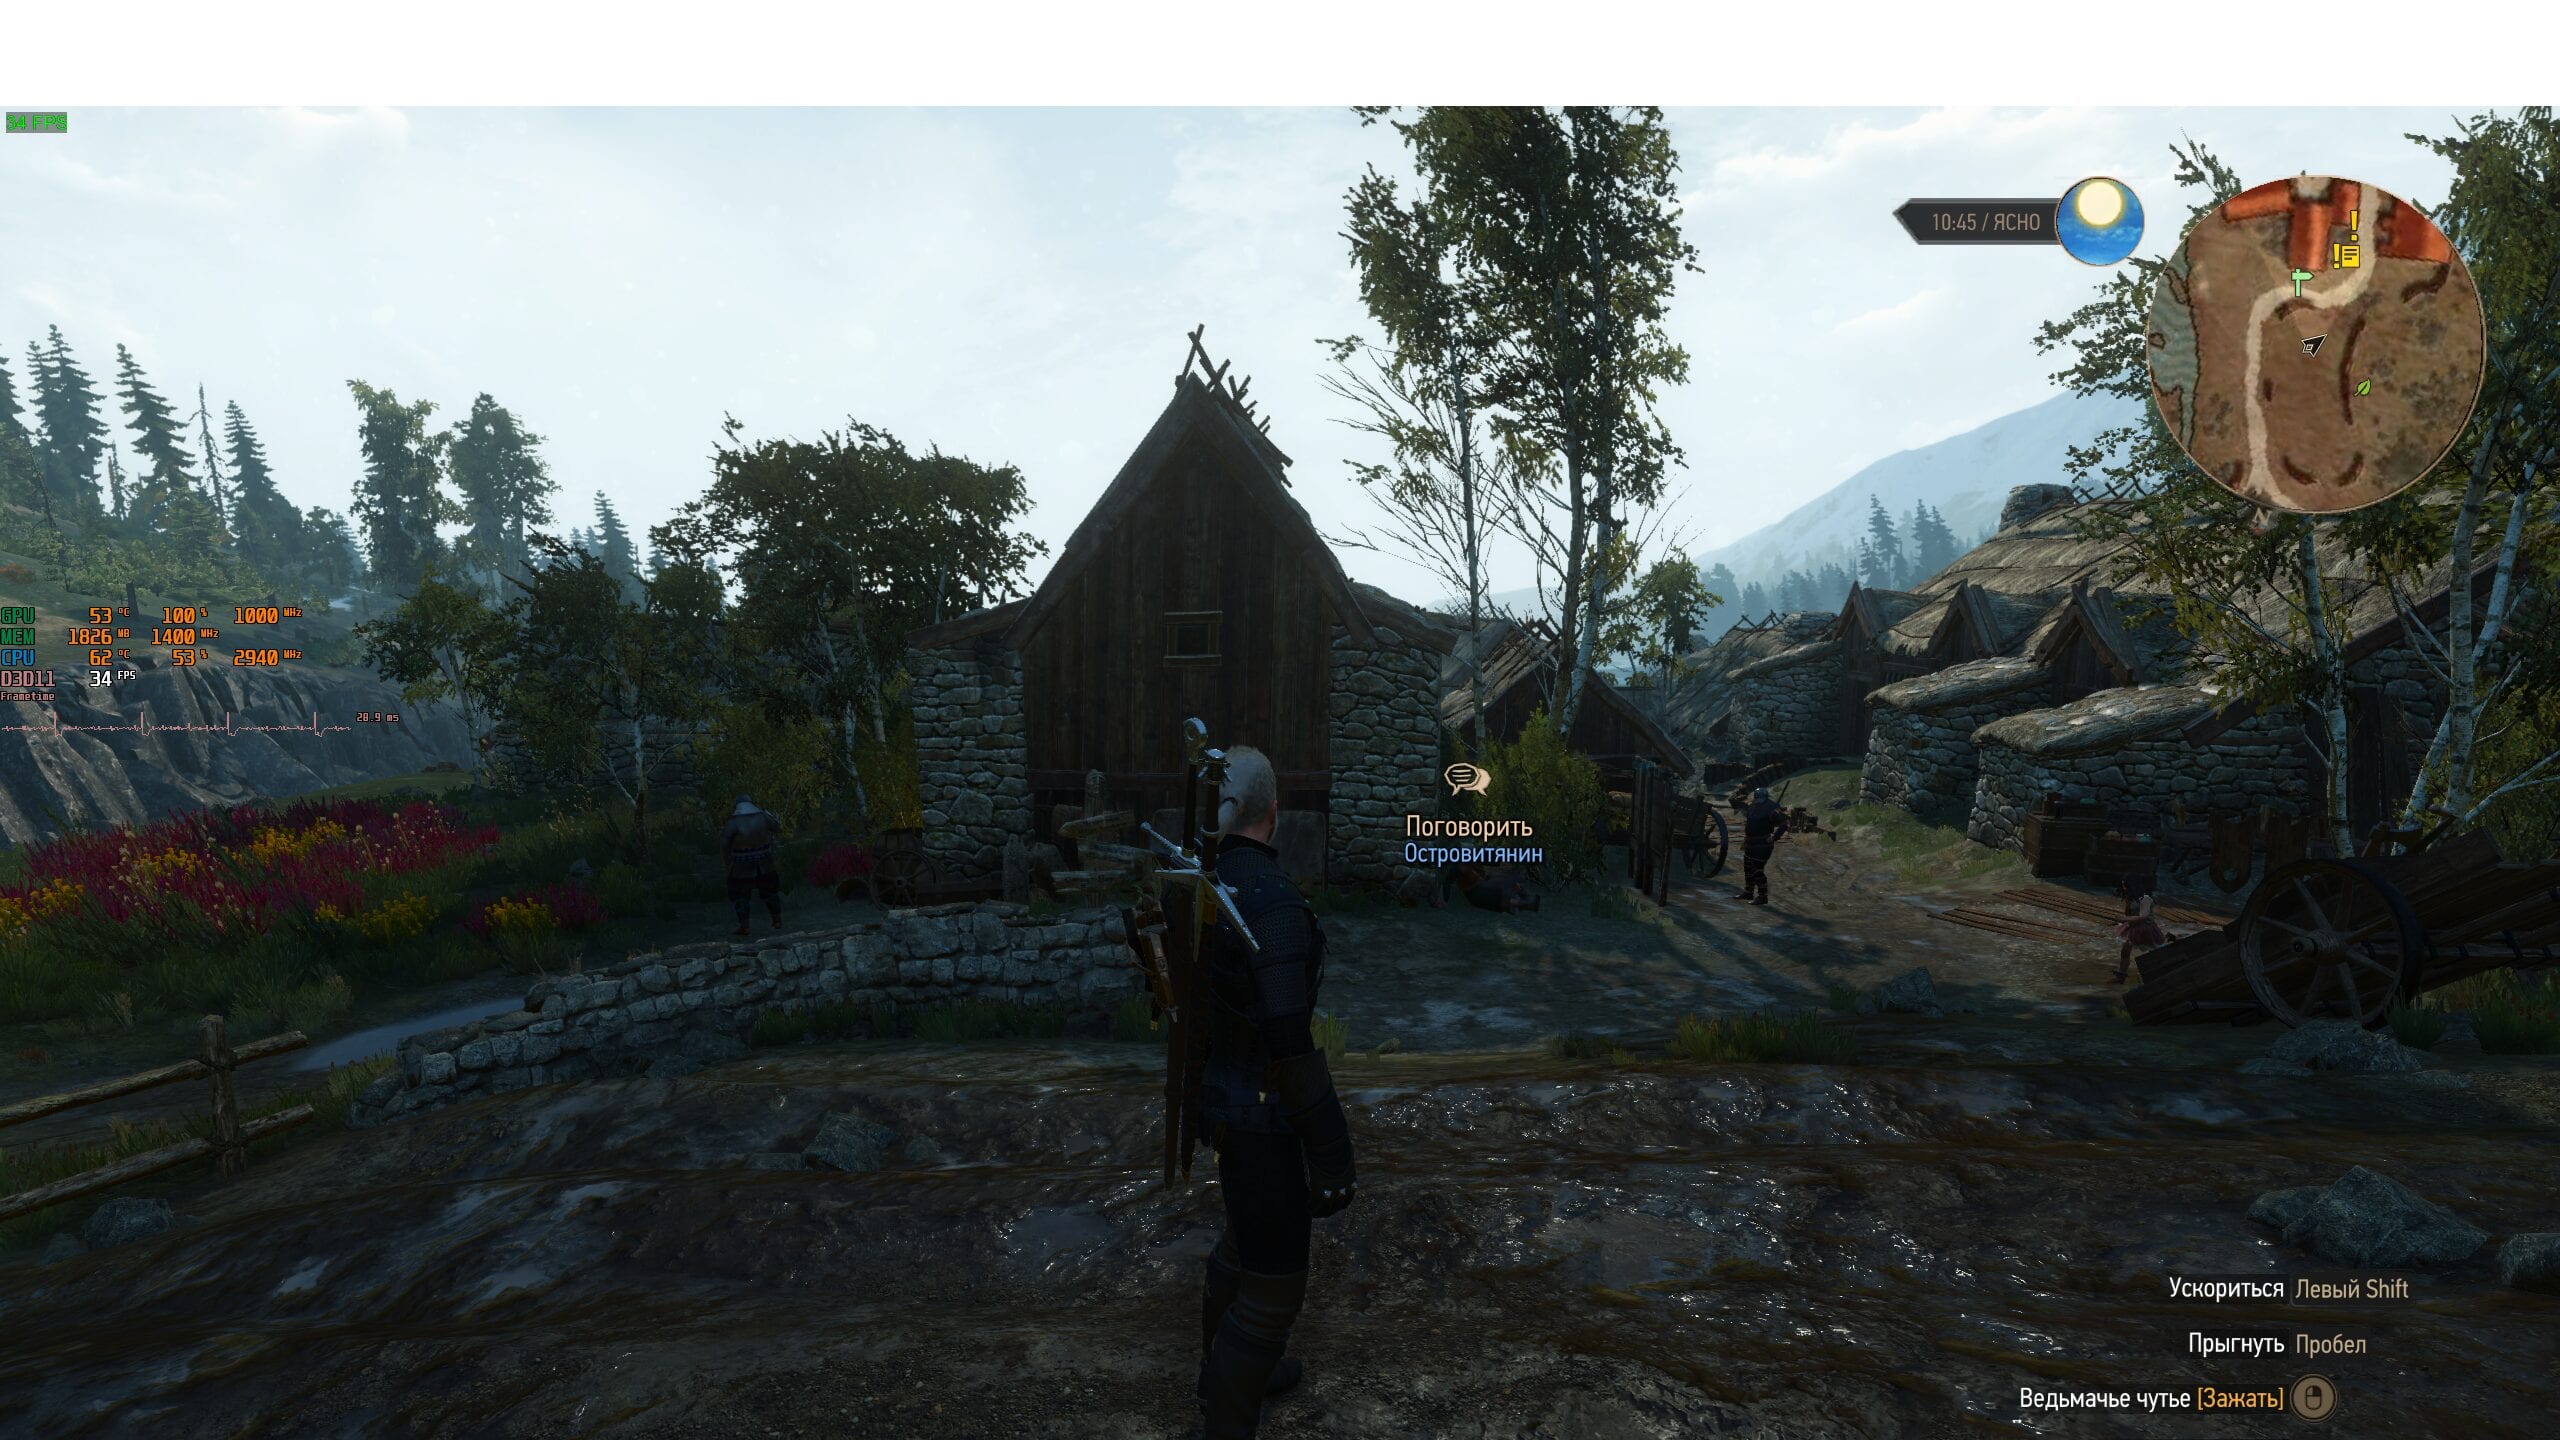
I would like to note that in the same Witcher the temperature did not exceed 53 degrees, which is 8 degrees lower than in the FurMark. Accordingly, the power consumption of the video card will also be slightly lower than in the stress test.
Below are links to all programs used in this guide, as well as a couple of modified low-power bios for the XFX Radeon R9 270X video card:
You can download the VBE7 BIOS editor at this link.
You can download the program for flashing the ATI ATIFlash / AMD VBFlash BIOS at this link.
BIOS for the XFX Radeon R9 270X video card with a voltage of 1000mv and frequencies of 900/1400MHz:
BIOS for the XFX Radeon R9 270X video card with a voltage of 1050mv and frequencies of 1000/1400MHz:
If you have any questions, or any wishes – you are welcome in the comments.


One reply on “Lowering GPU voltage of Radeon R9 270X / HD7870 graphics card (downvolting/undervolting any GCN 1.0 cards)”
thank you very much for your help.